Erin Spain

Home, DIY, & Photography

  • Home
  • About
    • Press
    • Advertise
    • Podcast
    • Disclosure & Policies
  • Project Gallery
  • YouTube
  • Photography
  • Contact

Quatrefoil Photo Wall Art Tutorial

June 19, 2012 By Erin Spain 44 Comments

Quatrefoil Photo Wall Art Tutorial
This was a very fun but somewhat tedious project, mainly because it was very “trial and error” in nature. But I think I’ve worked out all of the kinks so you won’t have to. This particular project was very exciting for me, mainly because this is the first project I’ve made from scratch that ended up looking exactly how I had pictured it in my head. I am going to include several photos and walk you through the process of how I made it with this quatrefoil photo wall art tutorial.
Quatrefoil Photo Wall Art
What I used for this project: 
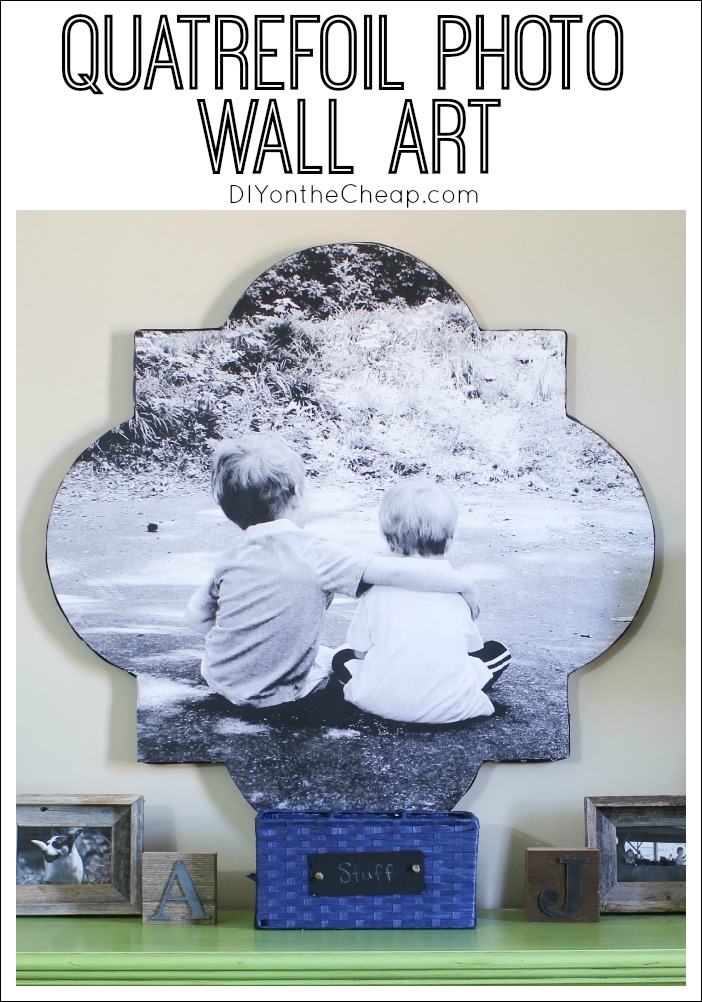
  • A 36″ x 36″ Engineer’s Blueprint copy of a high resolution photo (printed at Staples for $10.00)
  • A 36″x36″ quatrefoil template (printed at Office Max for around $5.00) A template can be found here, and check out the awesome mirror project while you’re there!
  • 2 sheets of Insulfoam 1″ x 4′ x 2′ Insulated Sheathing (Purchased from Lowe’s, $2.99 each). You could also use thinner foam board like this one found on Sugar Bee Crafts. This is another great tutorial if you’d rather go with a basic rectangle or square shape and don’t mind the thinner board. Update: FloraCraft makes sheets of StyroFoam that would work great for this project.
  • Spray Adhesive
  • Utility Knife
  • Scissors
  • Ribbon (I used metallic gold 1″ ribbon)
  • Brass Nailhead Trim (I used the individual nails rather than the type that is connected.)
  • Sharpie Marker and pen
  • Packing Tape
  • Command Picture-Hanging Strips (for hanging on wall)
  • Mod Podge Roller (optional)

This entire project cost me around $25.00 since I had most of the supplies on-hand. If you’re wondering why I printed my photo and template at two separate places, it’s because I initially tried to have both printed at Office Max but they were going to charge me $70+ because of the amount of ink used in the photo. Staples offered the blueprint so I went with them, but my quatrefoil template came out all distorted there. So then I went back to Office Max for the quatrefoil and it worked out just fine. FYI this photo is not “photo quality” – it’s really just a black and white photocopy, but I’m perfectly happy with the way it turned out. It doesn’t look grainy or pixelated at all.

Quatrefoil Photo Wall Art

The first thing I did after I gathered all of my materials, was attach the 2 sheets of Insulfoam. Why did I need 2 sheets? Well, I knew I wanted my finished product to be 36″ x 36″, and I couldn’t find sheets of Insulfoam that were wide enough. Hence, 2 sheets attached. The good news is, they are super easy to attach. All I did was lay them side by side and use a strip of packing tape on front and back to attach them. For some reason, one sheet came with silver foily stuff on the front side and one did not. I just peeled it off. (By the way, I’m sure the technical name for it is “silver foily stuff.”)

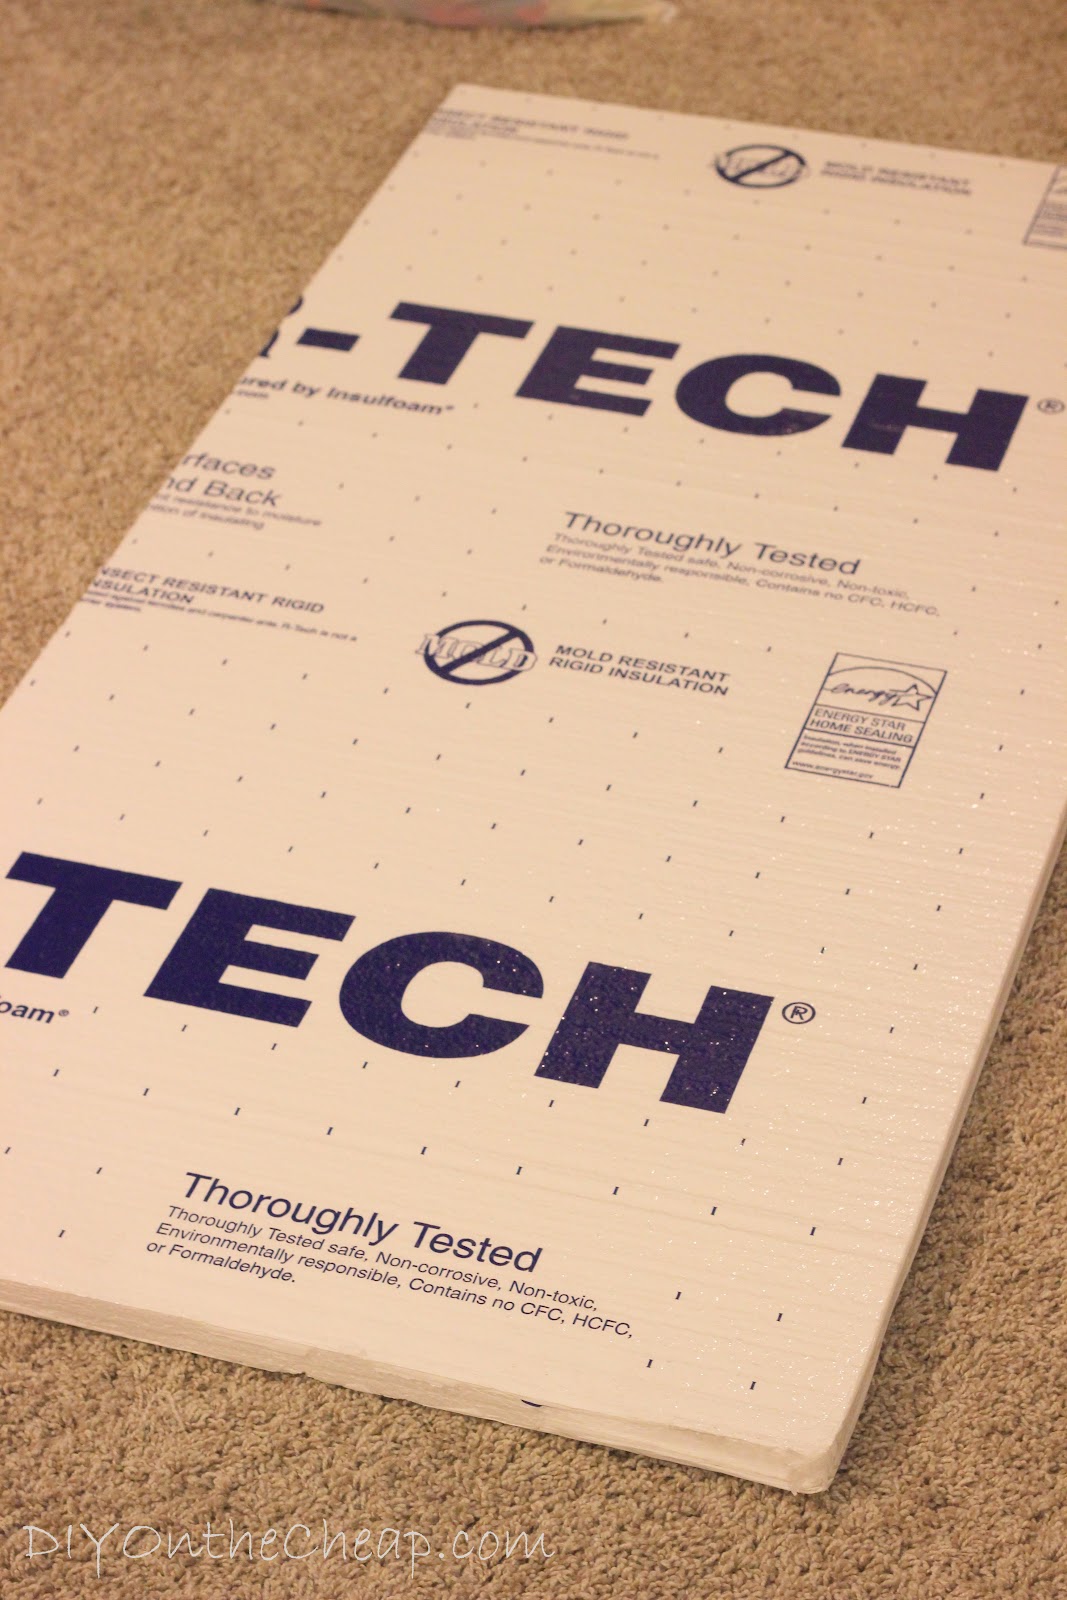
I used 2 of these Insulfoam boards.
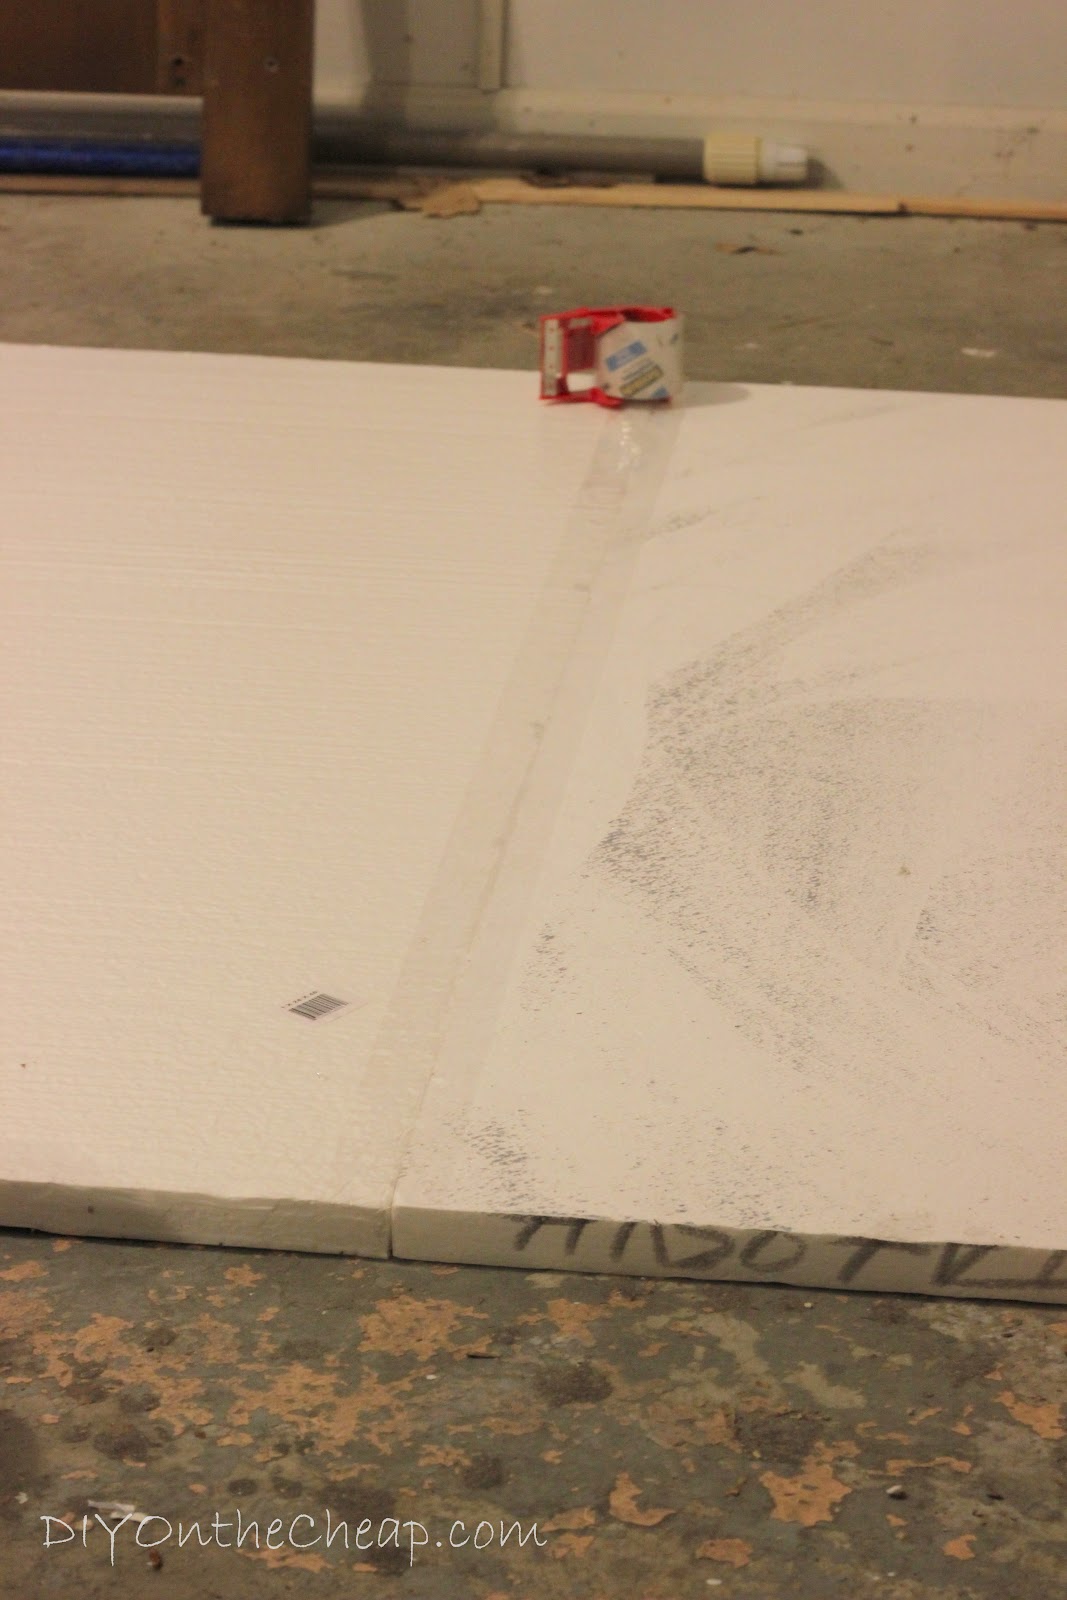
Attach foam boards with packing tape.

Next, I cut out my quatrefoil template and laid it in the center of my now-attached Insulfoam sheets. I laid a bunch of random objects on top of it to hold it in place and make it lay flat. I then used a Sharpie to trace the template, and cut it out with a utility knife. I basically sawed through it with the knife, carefully snapping it away little by little. I used scissors to trim away the excess and smooth out the edges.

Position your template on top of the foam board, and place random “stuff” on top of it to hold it in place.
Trace your template onto the foam board with a Sharpie.
Cut out with utility knife.
Now the foam backing is ready!

Then, I laid my quatrefoil template on top of my photo (centering it as best as I could),  traced it with a pen, and cut it out with scissors.

Center template on top of photo, place random “stuff” on top to keep it in place while you trace it.

Now, my photo was ready to be attached to the foam board. I headed out to the garage (spray adhesive can have serious fumes, so work in a well-ventilated area!), and sprayed my foam board thoroughly. I waited one minute (as instructions recommend) and then carefully positioned my photo on top of the foam board, starting at the top and slowly laying it down. I rolled it with my Mod Podge roller to make sure I got all of the little bubbles out and to prevent wrinkles, but I’m not sure that this was necessary. I could have probably just smoothed it out with my hands.

Spray with adhesive, then attach photo to foam board.

Since the paper adhered very quickly to the foam board, I couldn’t really shift it around at all. It was a teeny bit off-center, so the styrofoam showed at the edge on one side. I simply used my utility knife and some scissors to carefully trim the excess away and touch up the edges.

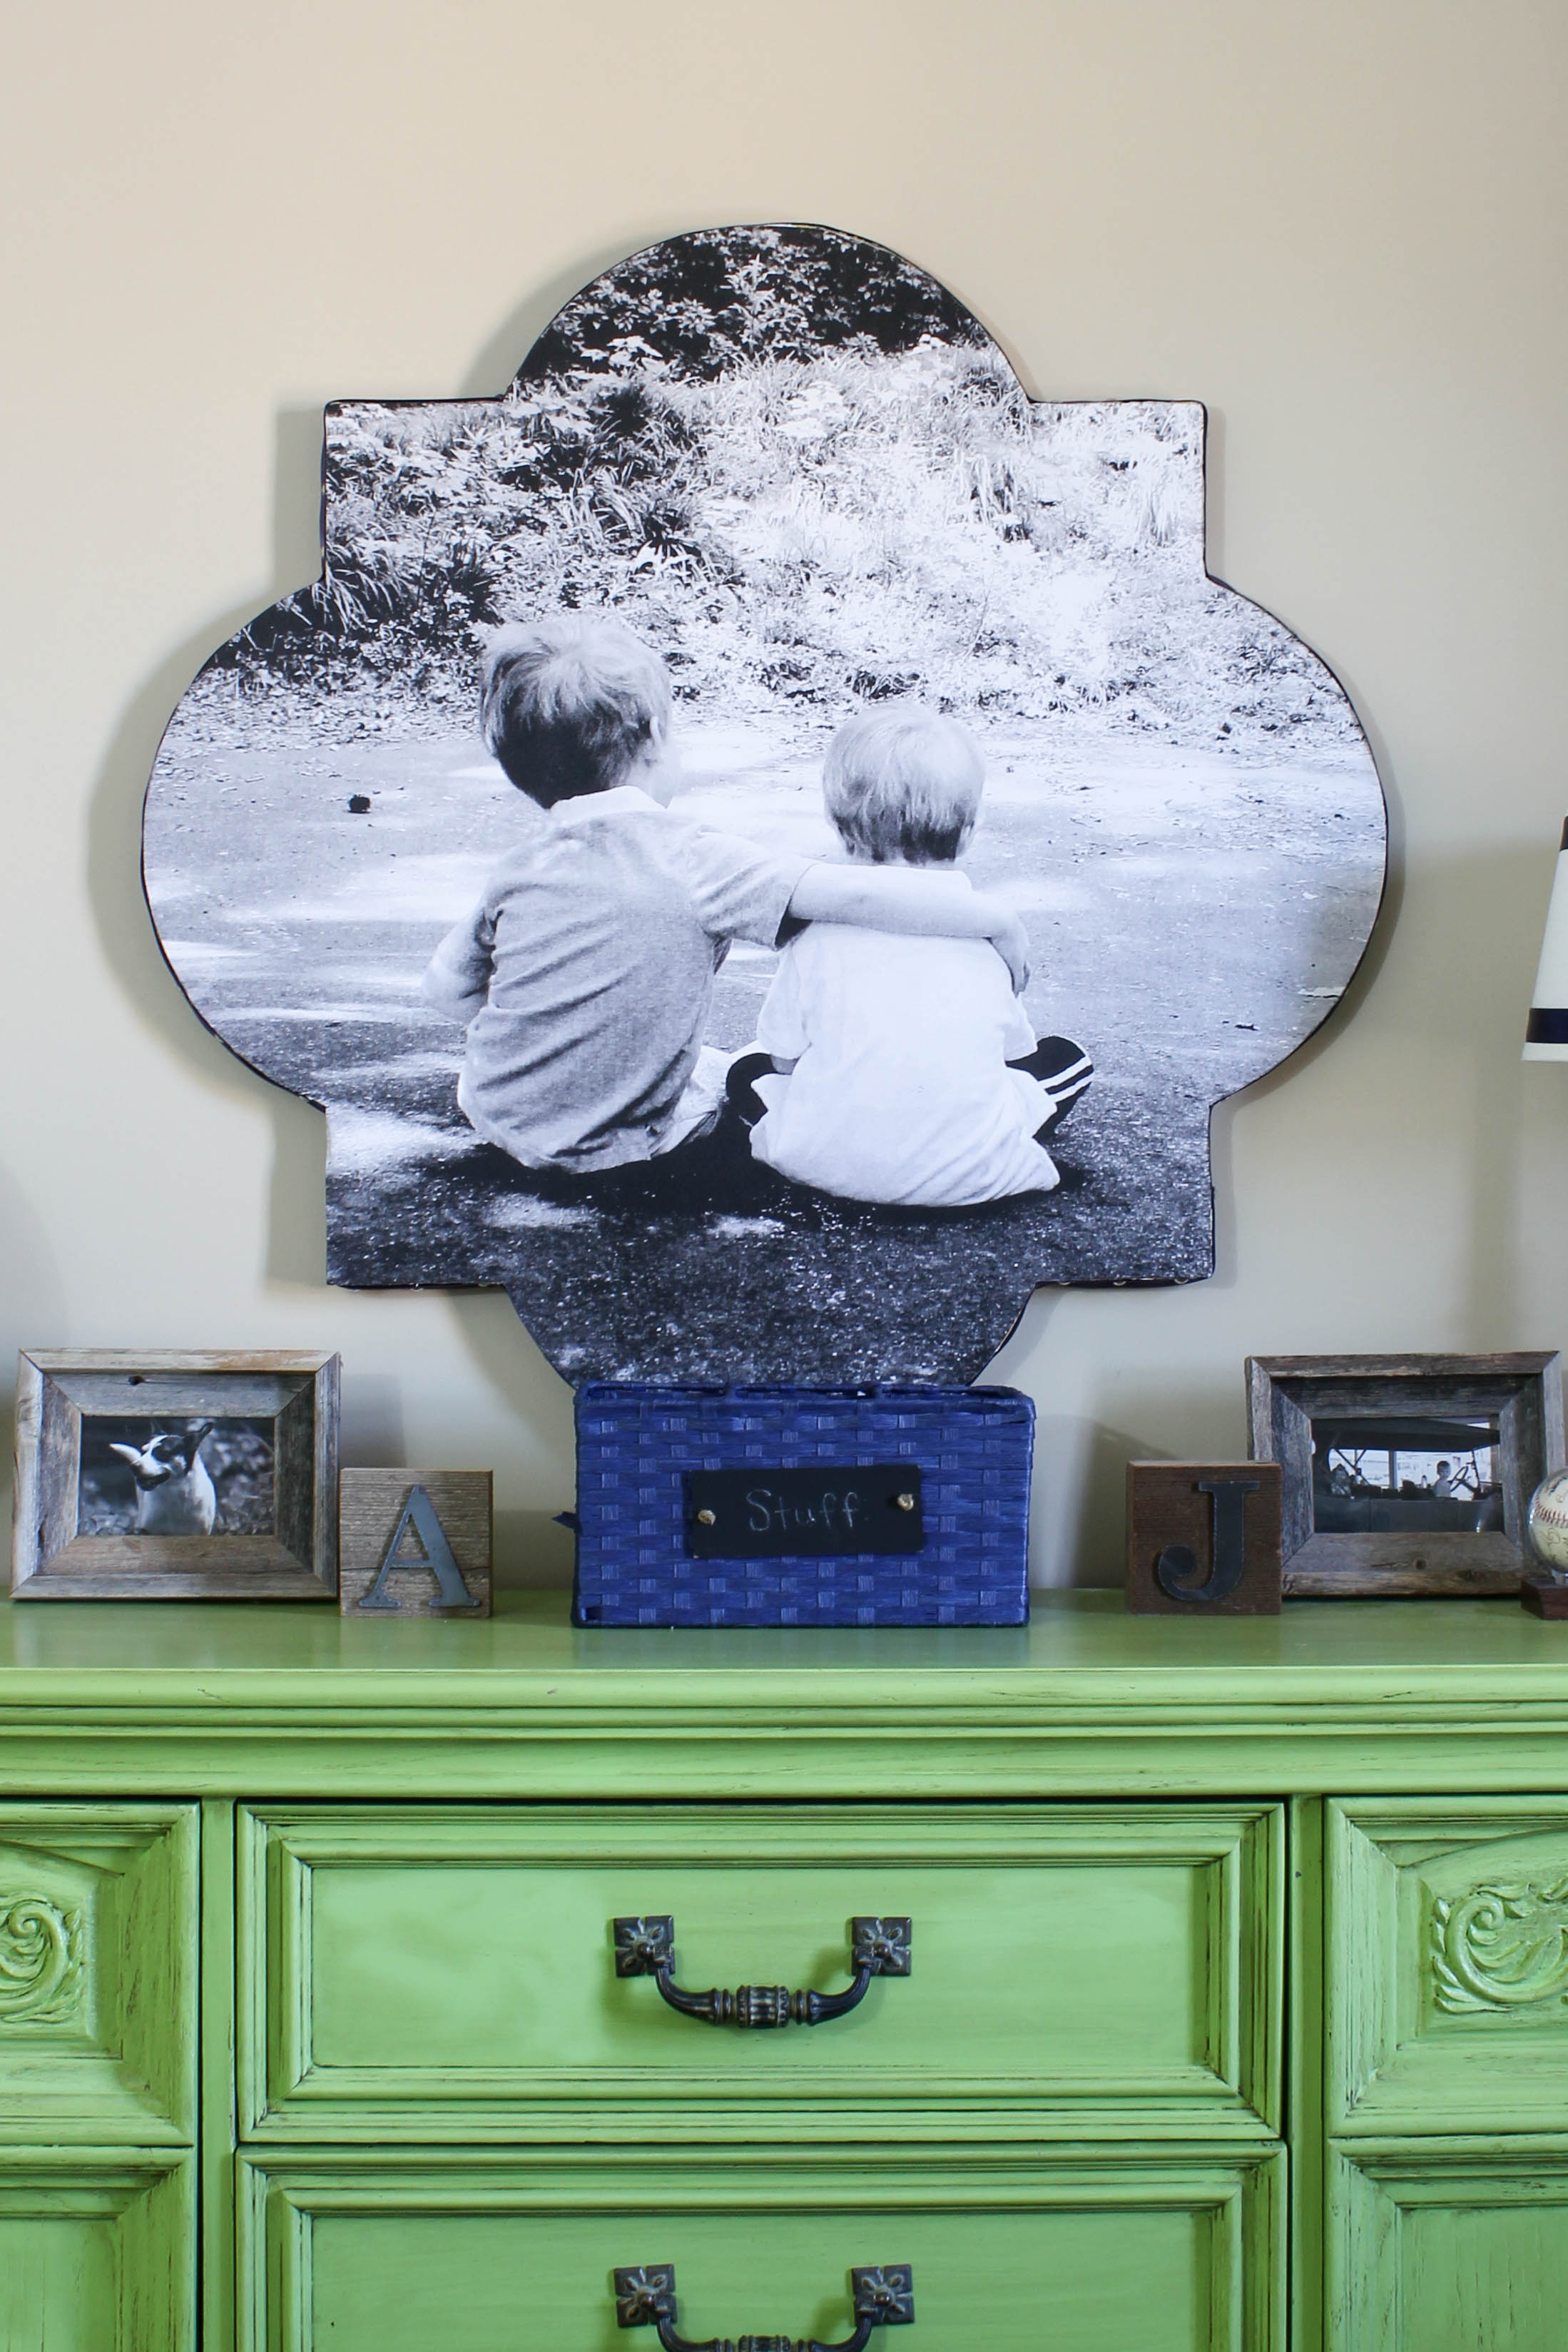
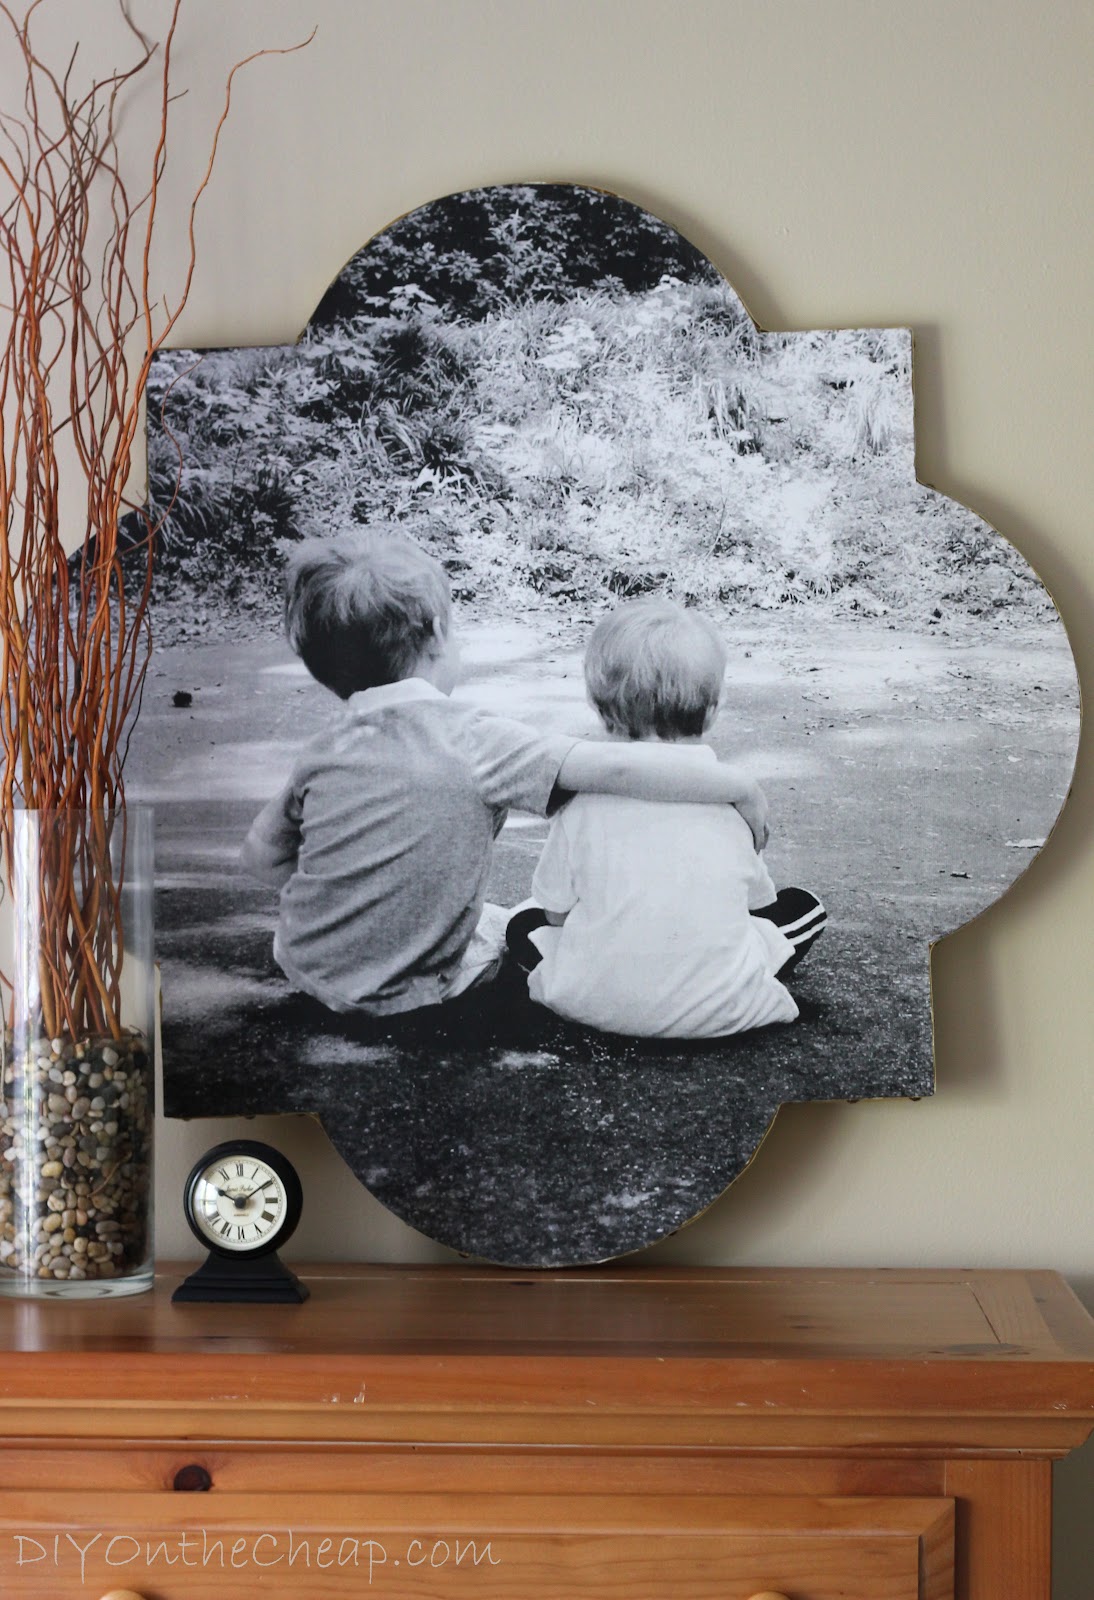
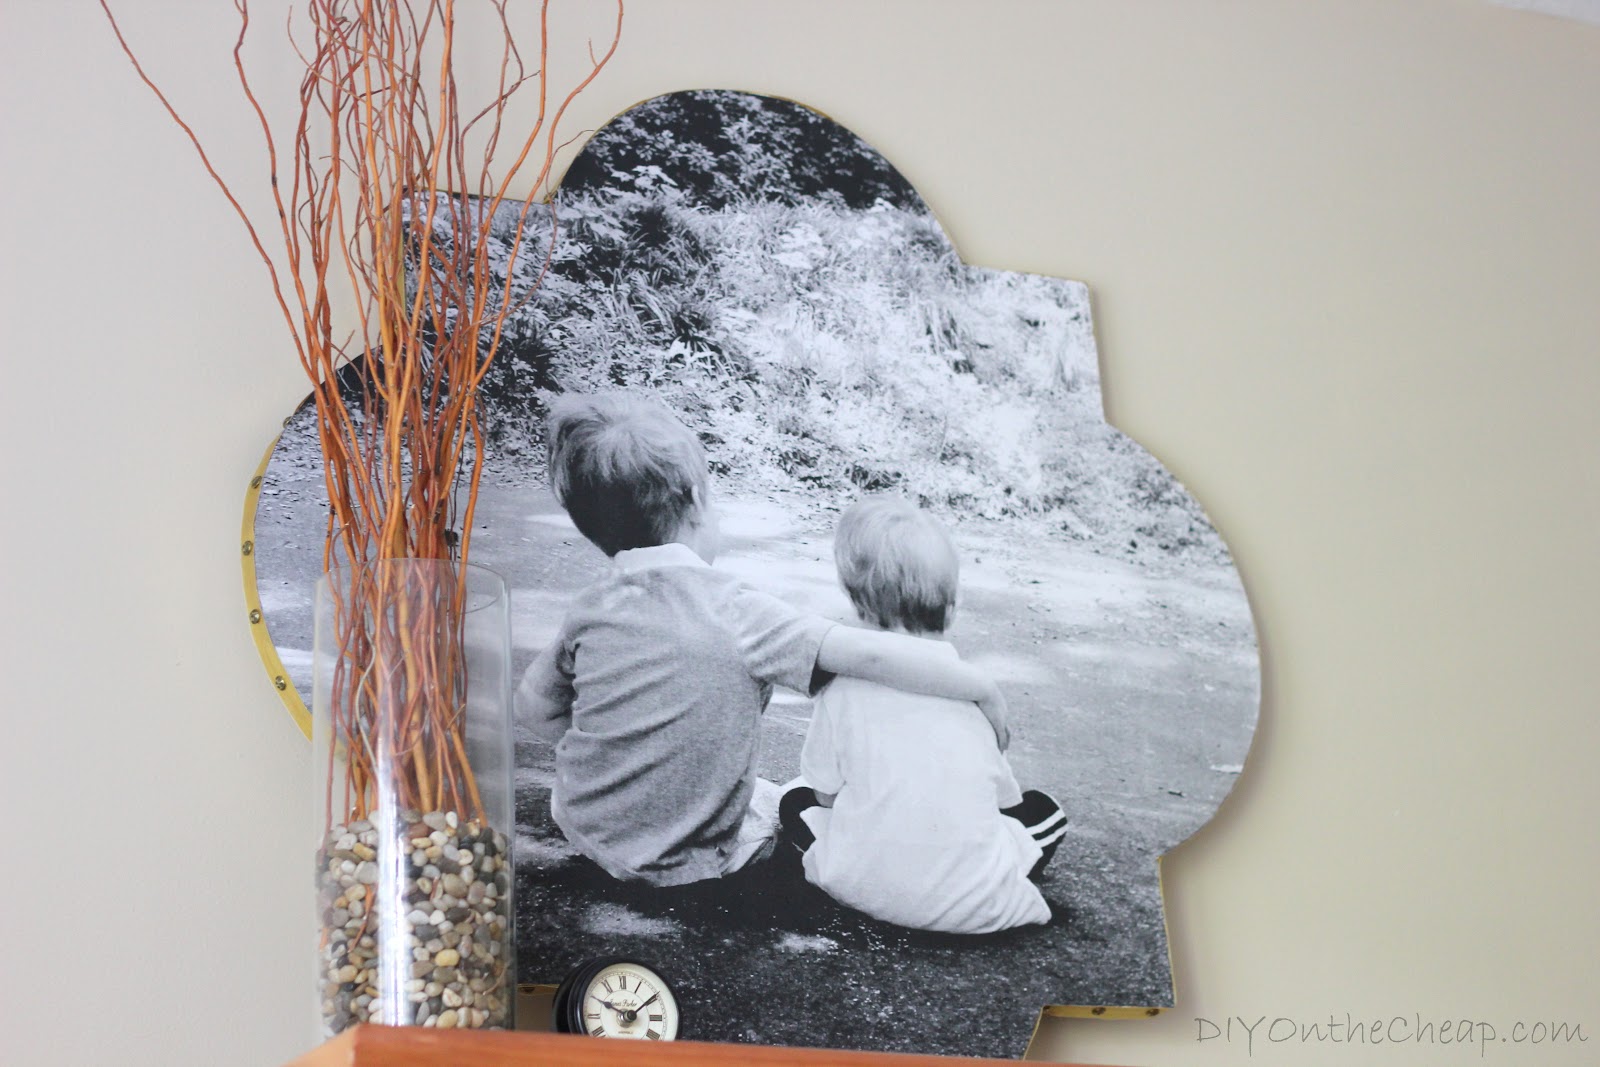
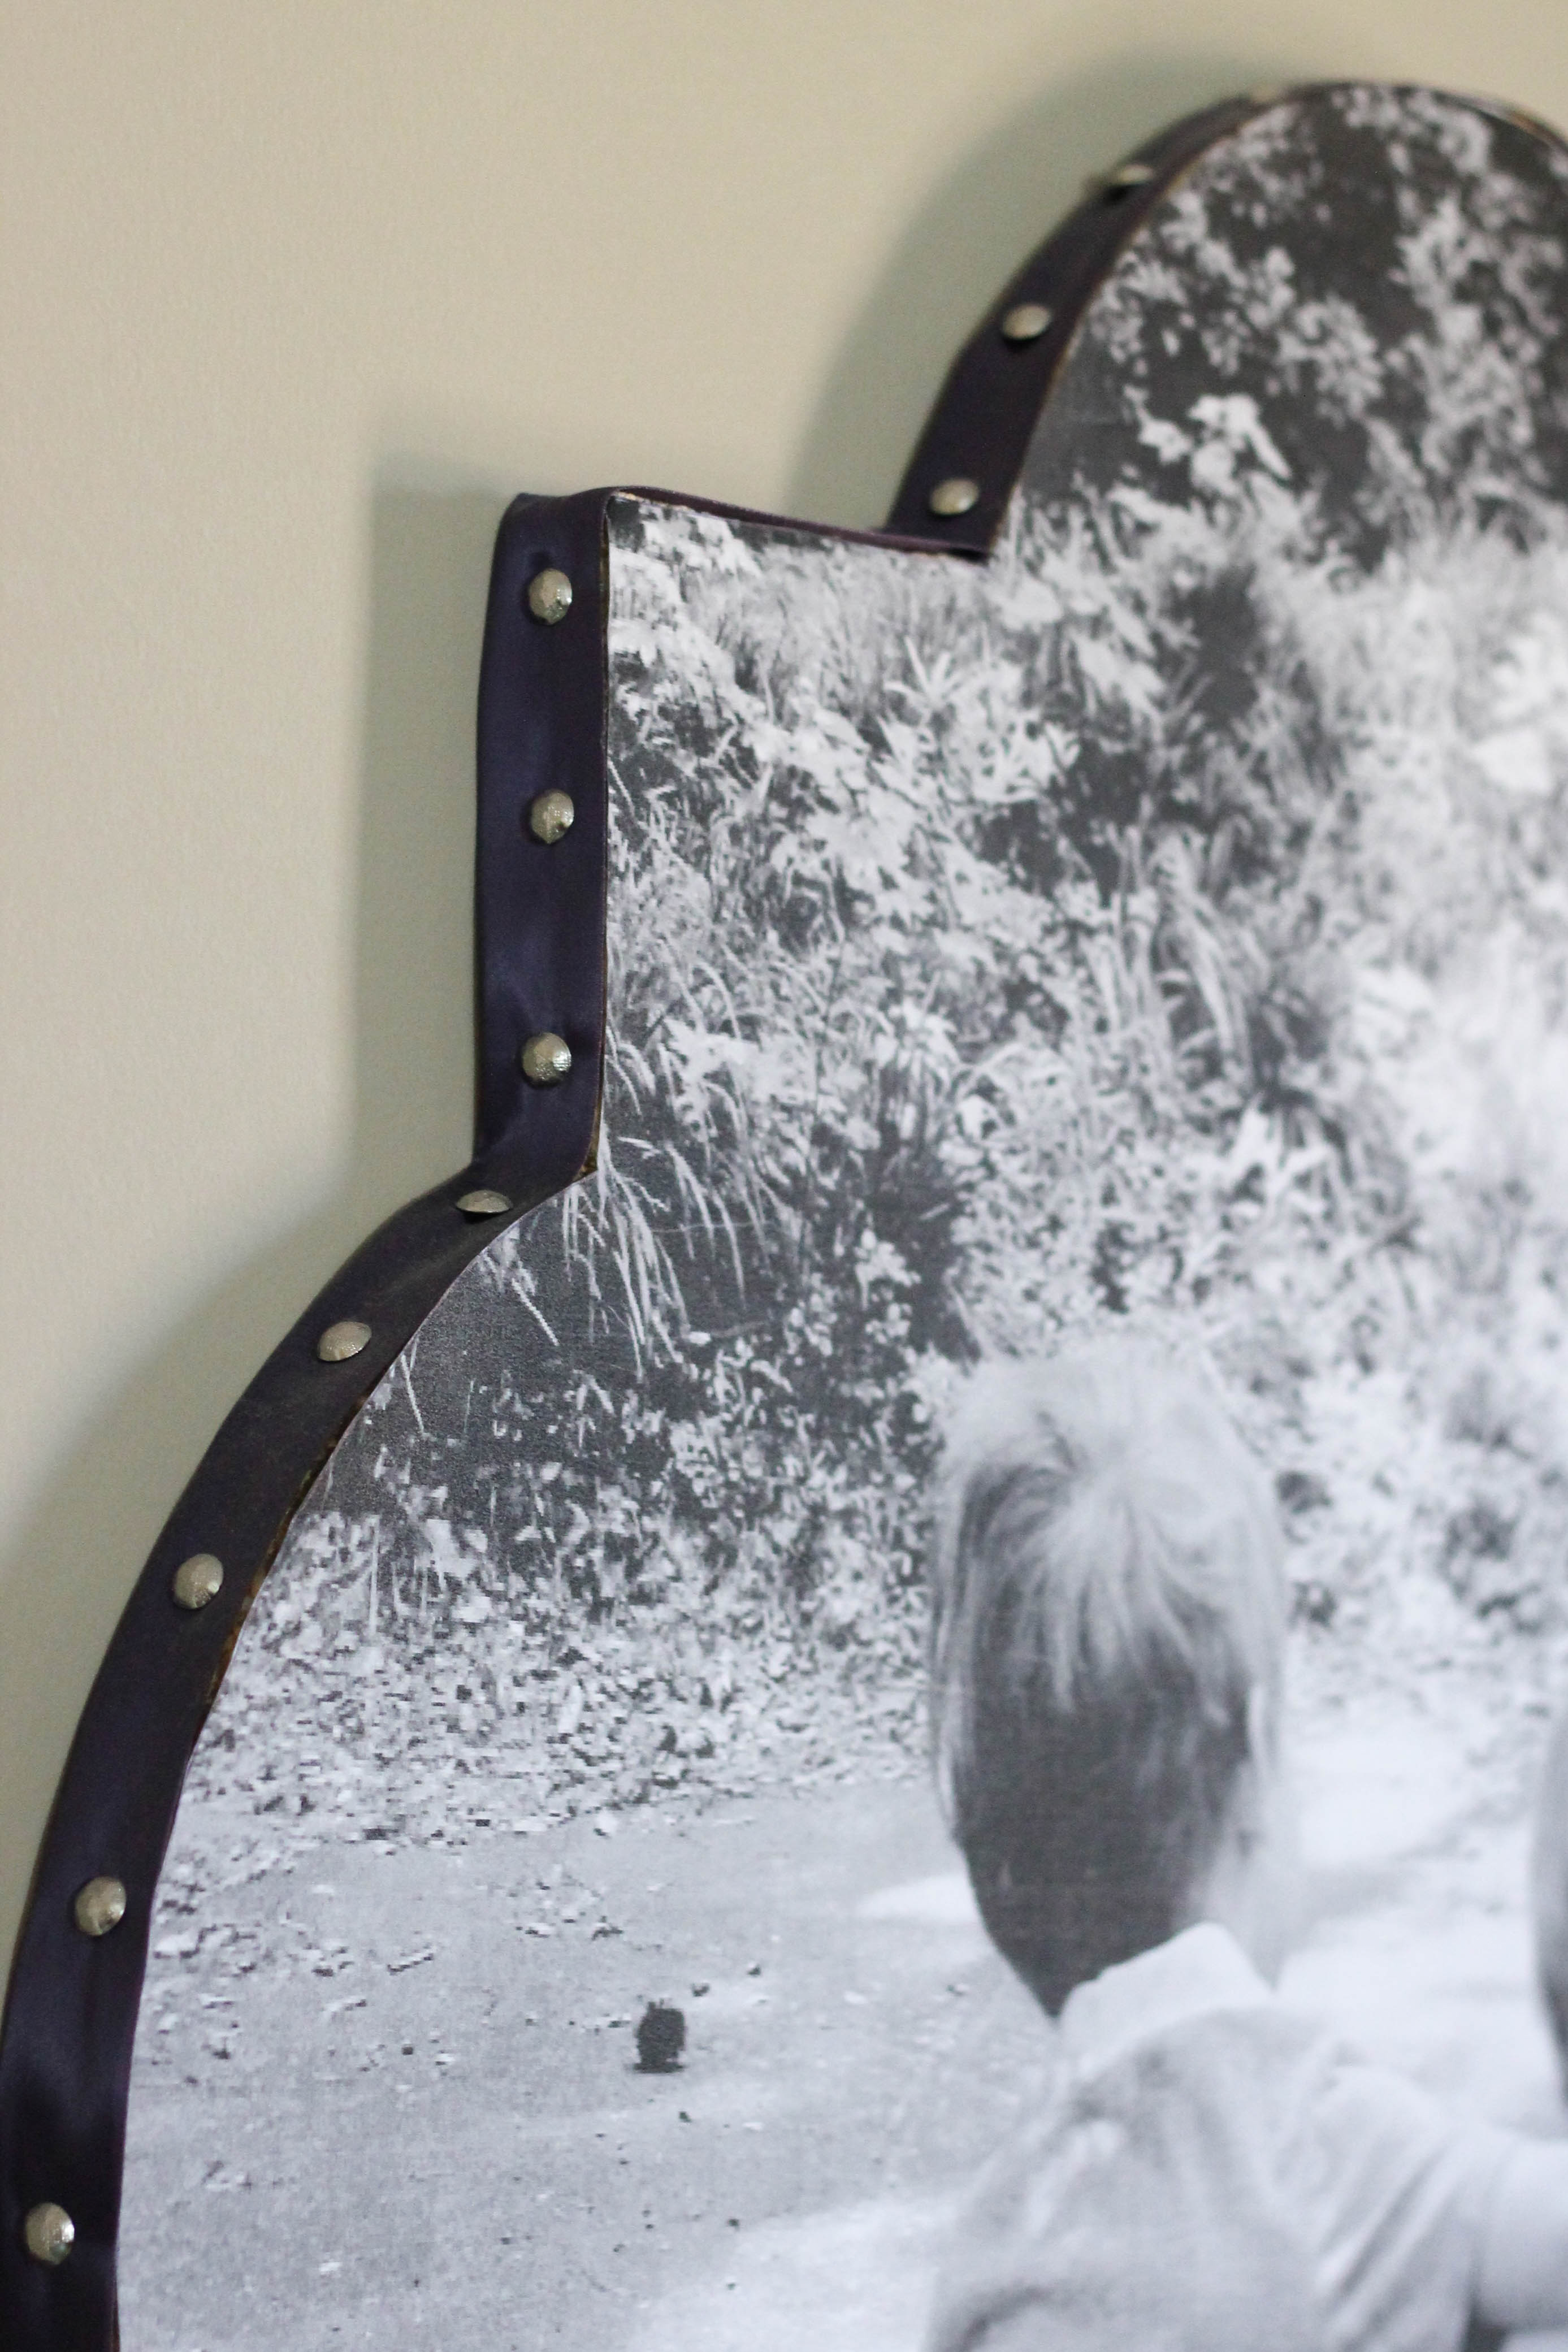
I tried painting the edge of the styrofoam (don’t do this – it looks gross). If you do choose to paint, use acrylic craft paint, not spray paint, as spray paint eats away at the foam. Instead of painting, I decided to use gold metallic ribbon (I used gold because this photo is going in our “modern” room over this dresser, which has gold hardware. Silver or black would look great too. I attached the ribbon using my nailhead trim. I didn’t measure, I just eye-balled where I wanted them to go and spaced them out evenly. I went through about 10 feet of ribbon. One roll made it almost all the way around. When I needed to start a new roll, I just folded the end under to create a smooth edge, and pinned it down with nailhead trim so you couldn’t tell where the old piece ended and new piece began.

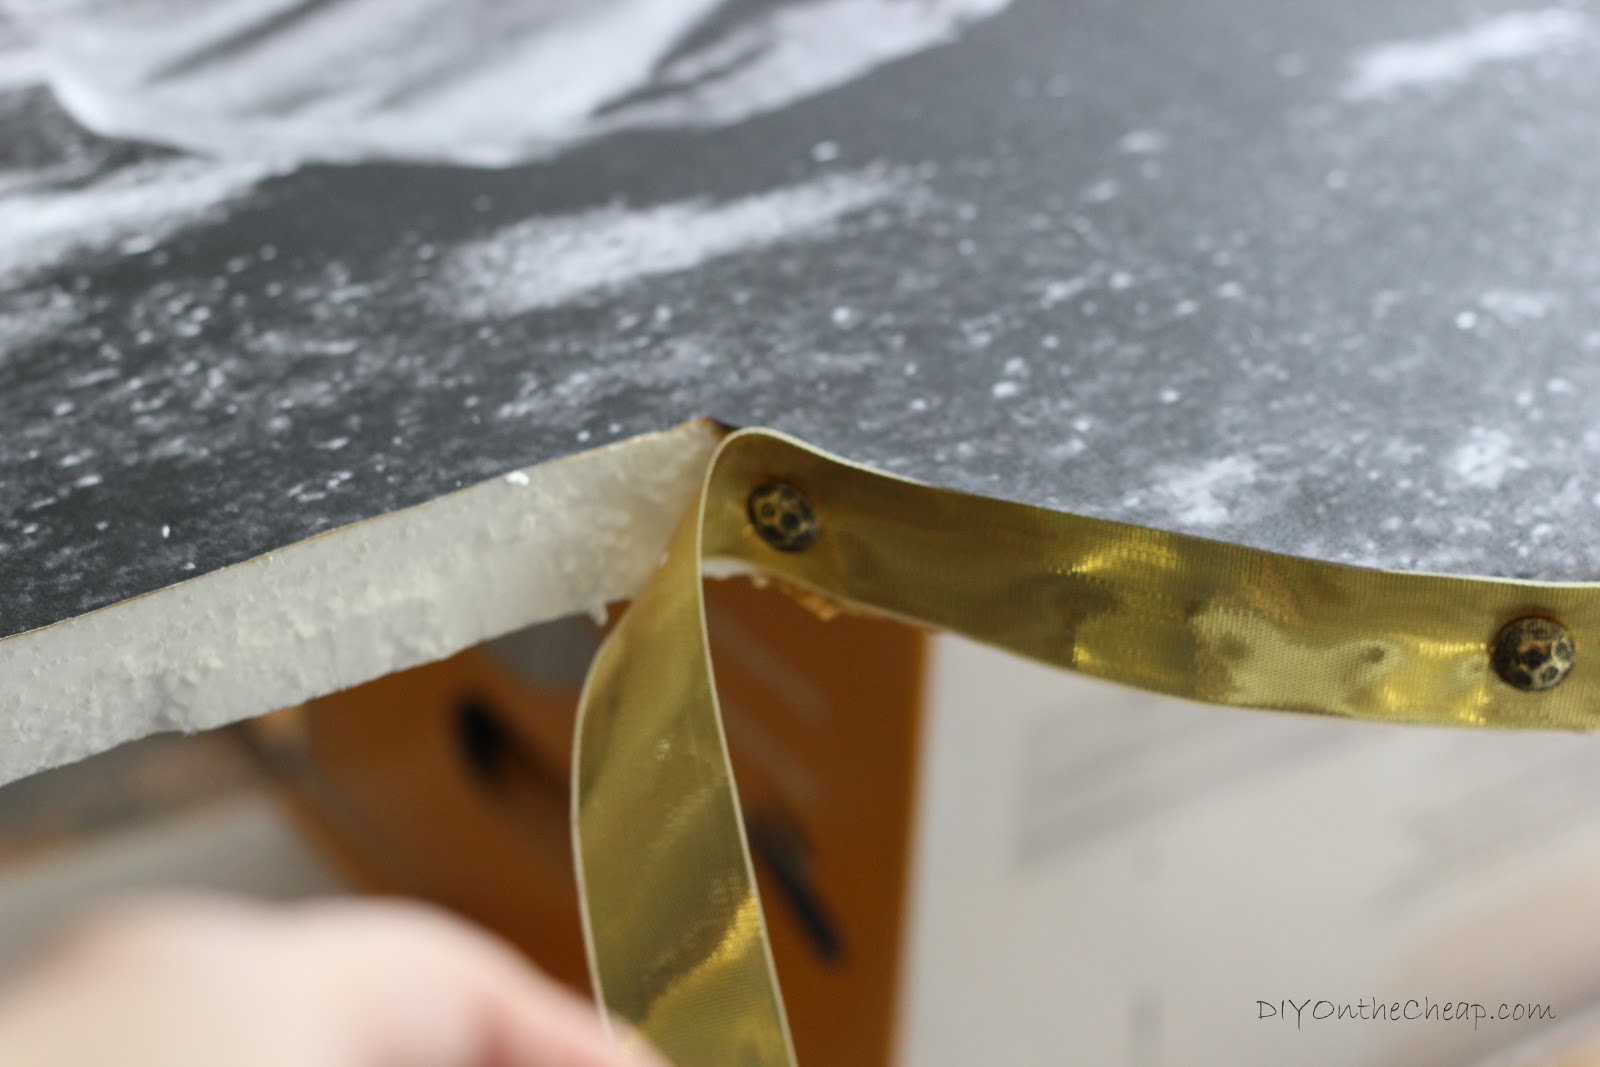
Attach ribbon with nailhead trim.

After my ribbon and nailhead were in place, I was ready to hang it up! I tried attaching picture hardware to the back using both tiny nails and duct tape, but it was a disaster. I recommend double-stick tape or command strips. That’s it! You could really use this method to do any shape you’d like.

Now, for more photos of the final product:

Quatrefoil Photo Wall Art 
 Quatrefoil Photo Wall Art

If you try this, please let me know! I’d love to see your results and maybe even feature it here on the blog!

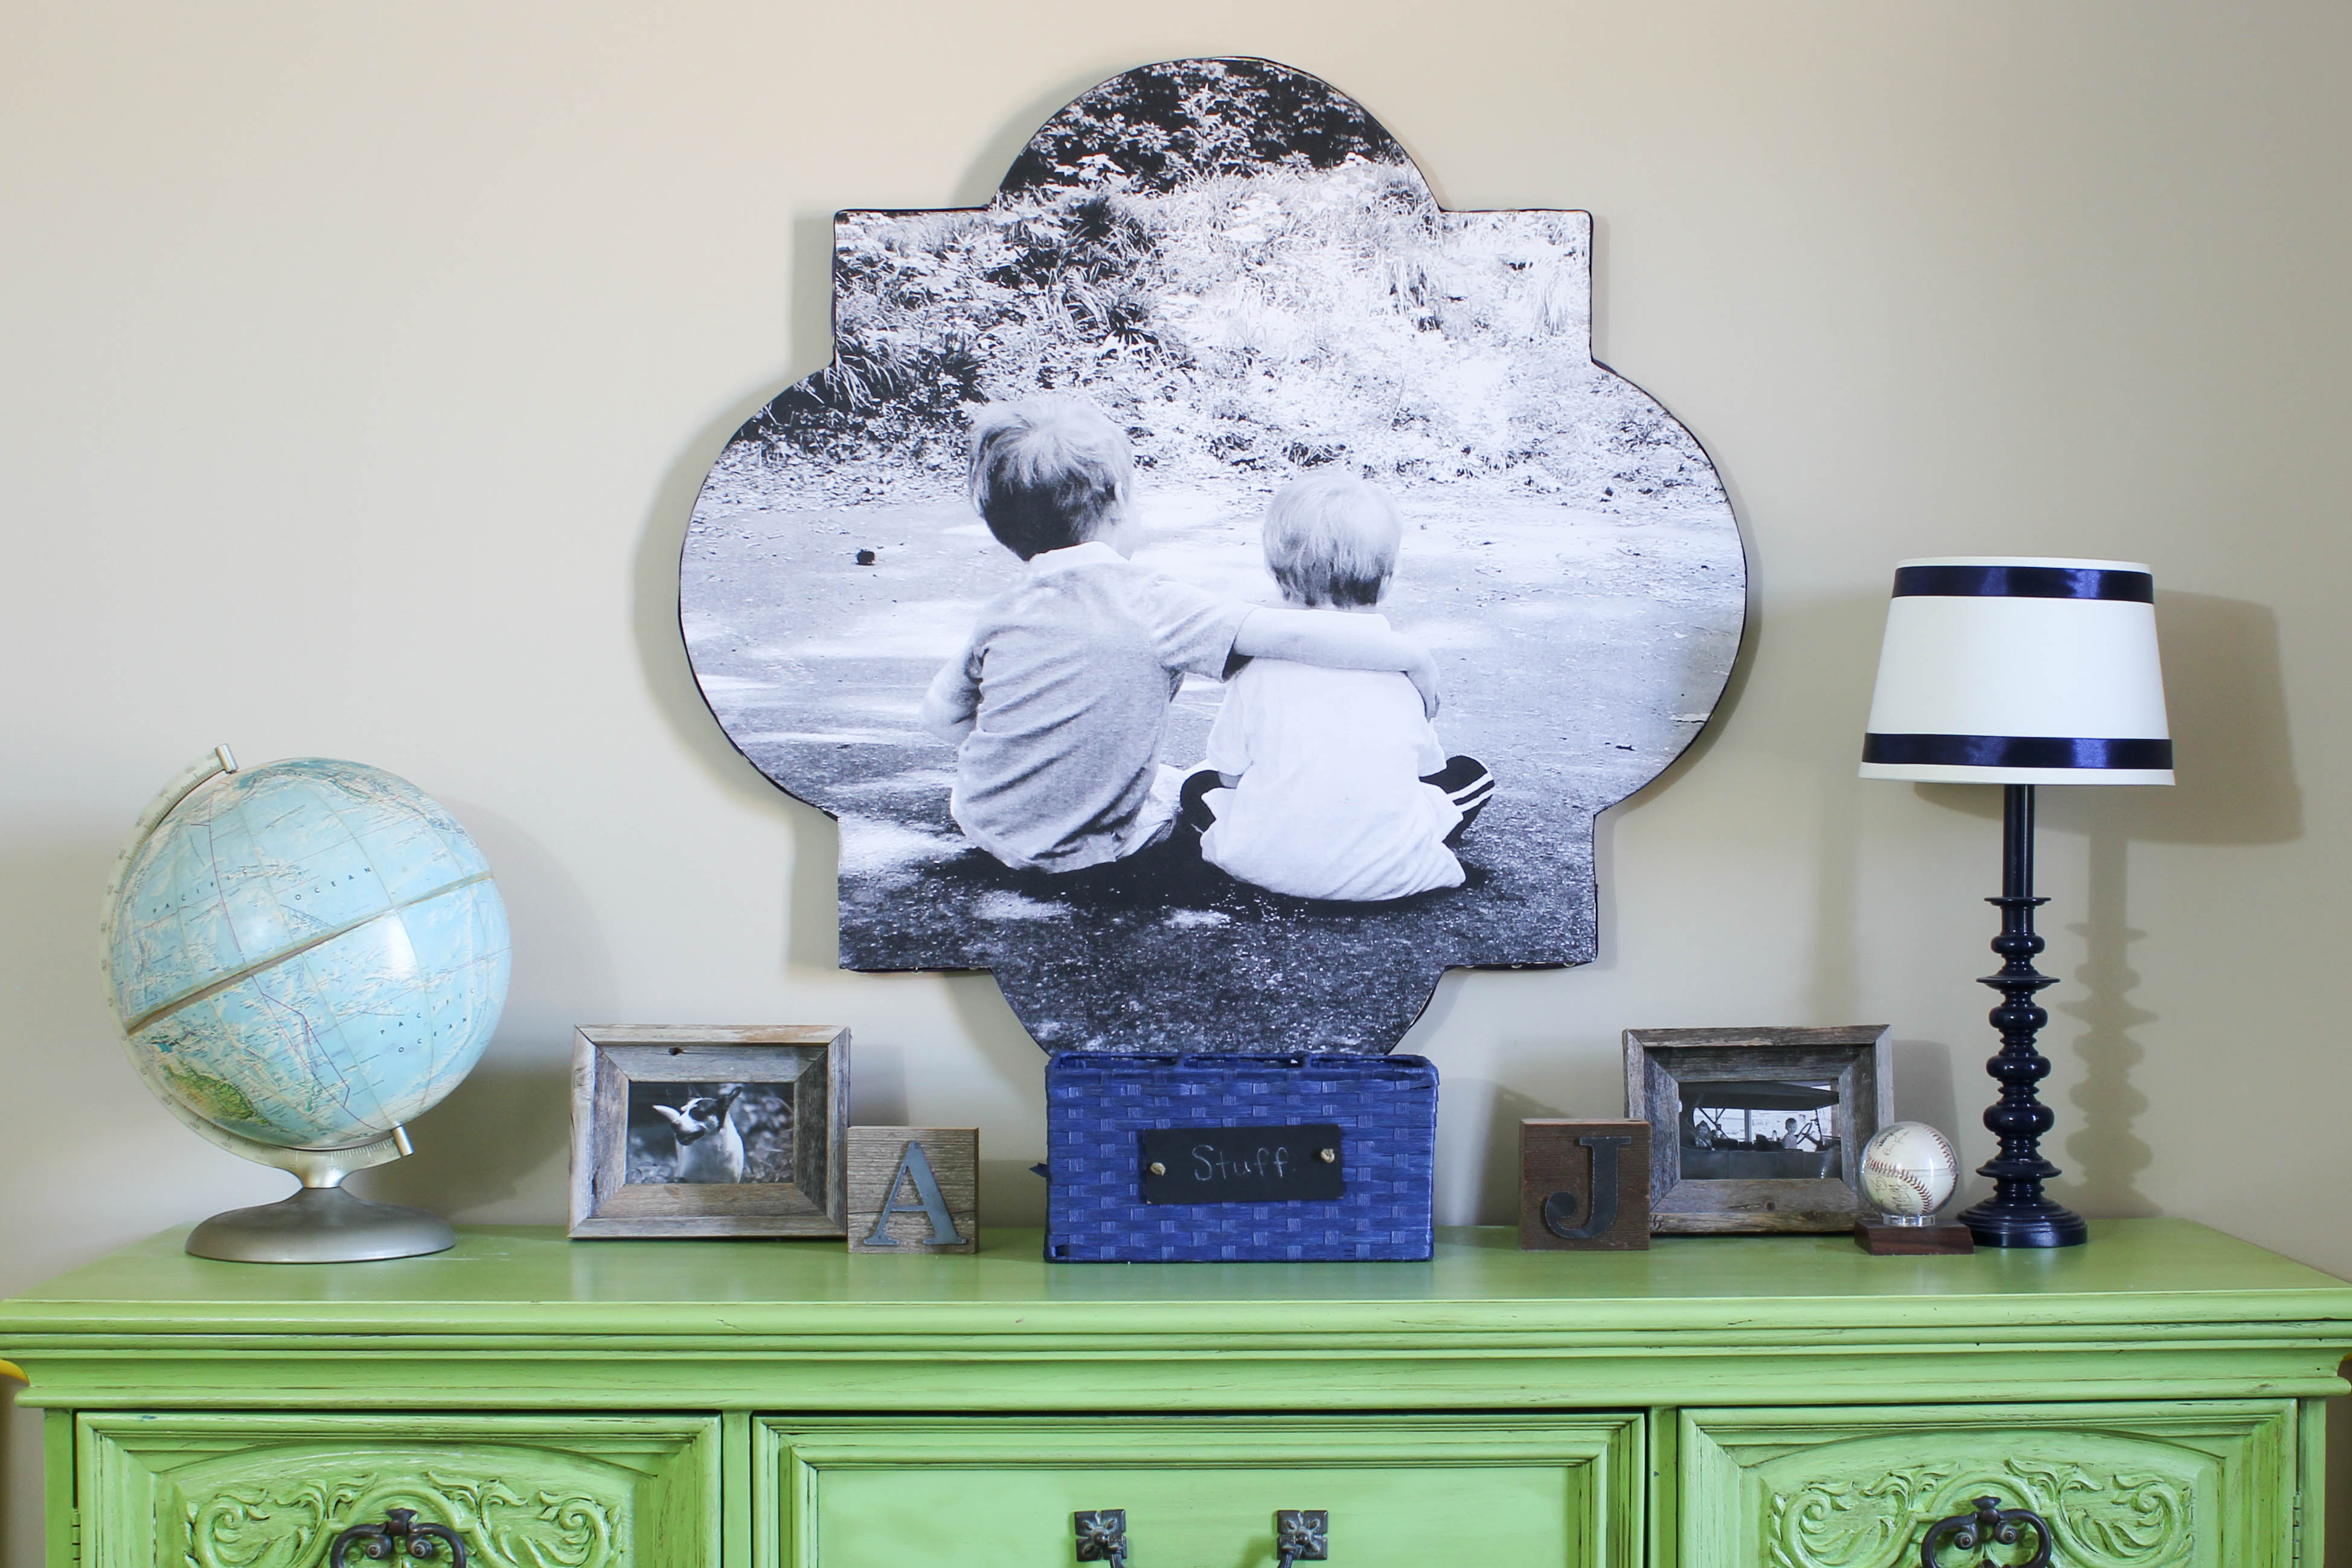
Update: I switched out the ribbon when I moved this art into our boys’ bedroom.

Quatrefoil Photo Wall Art Tutorial


Quatrefoil Photo Wall Art

Disclosure: This post contains affiliate links.

You might also like these posts:

  • DIY Quatrefoil Abstract Art
  • DIY Swiss Cross Planter
  • Stenciled Canvas Instagram Photo Display

subscribe box post footer

Filed Under: Art, Crafts, Decorating, DIY, Home & DIY Blog, Tutorials, Wall Decor

« Awesome Furniture Find
Ask Five: Kristan Cunningham »

Comments

  1. JenniferSimmons says

    June 19, 2012 at 6:40 pm

    Great job Erin! I absolutely LOVE this! I believe I will be doing this project in the near future 😉

    Reply
    • Erin Spain says

      June 22, 2012 at 1:40 am

      Thank you Jennifer!

      Reply
  2. Nancy says

    June 20, 2012 at 11:49 am

    Erin, A lot of steps but it looks fantastic!! Thanks for the Tutorial, I can see some Christmas Gifts coming from this project!!

    Huggs, Nancy

    Reply
    • Erin Spain says

      June 22, 2012 at 1:40 am

      Thanks Nancy!

      Reply
  3. Meredith says

    June 21, 2012 at 5:37 pm

    I love how this project turned out! Stopping by to say hi and that I’ve nominated you for the Sunshine Award! Thanks for being so inspiring! 🙂

    Meredith @ Wait Til Your Father Gets Home

    http://www.waittilyourfathergetshome.com/2012/06/21/sunshine-award/

    Reply
    • Erin Spain says

      June 22, 2012 at 1:41 am

      Wow, Meredith! I am flattered! Thank you so much.

      Reply
  4. Cassie @ Primitive & Proper says

    June 24, 2012 at 2:14 am

    hi erin! i don’t think we met at haven, but i was there, too! i just saw that you happened to start following some of the blogs i popped over to from haven and figured it must be from that, too, so came here. LOVE LOVE this project- seriously amazing! nice to meet you after the fact! 😉

    Reply
    • Erin Spain says

      June 24, 2012 at 2:28 am

      Thanks so much, Cassie, and sorry we didn’t get a chance to meet! Next time, for sure. I’ll be sure to check out your blog too!

      Reply
  5. Johnnie says

    June 24, 2012 at 5:54 pm

    I love this, Erin!! Great project. I think the ribbon looks cool as your edging. I am sharing this on SBLC facebook page.

    xoxo
    Johnnie
    Printable Decor
    Saved By Love Creations
    Decor 2 Adore{able}

    Reply
    • Erin Spain says

      June 24, 2012 at 10:34 pm

      Thank you so much! I appreciate that.

      Reply
  6. Laura/Pet Scribbles says

    June 24, 2012 at 8:40 pm

    Wow Erin – this one is incredible! I love anything with nailheads, and I can’t get over what the nailheads + ribbon add to the overall look. 🙂

    Reply
    • Erin Spain says

      June 24, 2012 at 10:34 pm

      Thanks so much, Laura! I appreciate it!

      Reply
  7. Amanda says

    June 25, 2012 at 11:55 am

    I didn’t realize how big that was until i started looking at the step photos, beautiful!

    Reply
    • Erin Spain says

      June 25, 2012 at 1:07 pm

      Thank you Amanda!

      Reply
  8. Melissa @ No. 2 Pencil says

    June 25, 2012 at 1:35 pm

    This is way cute! I’m pinning!!!

    Reply
    • Erin Spain says

      June 25, 2012 at 1:39 pm

      Thank you! I appreciate that.

      Reply
  9. Jenna, SAS Interiors says

    June 25, 2012 at 10:59 pm

    It looks awesome Erin! So unique with the quatrefoil design. And by the way, that blue dresser is gorgeous. xo Jenna

    Reply
    • Erin Spain says

      June 26, 2012 at 6:12 pm

      Thanks so much, Jenna! I appreciate that.

      Reply
  10. Michelle from Color Chats says

    June 26, 2012 at 2:06 pm

    This looks awesome Erin!

    Reply
    • Erin Spain says

      June 26, 2012 at 6:12 pm

      Thank you, Michelle!

      Reply
  11. Katie says

    June 26, 2012 at 3:06 pm

    Erin–this is gorgeous!!! You’ve inspired me to make one of these!

    Reply
    • Erin Spain says

      June 29, 2012 at 1:13 am

      Thanks so much Katie! Can’t wait to see it if you do make one!

      Reply
  12. Niki says

    June 28, 2012 at 9:43 pm

    How unique! Than you for a great tutorial.

    Reply
    • Erin Spain says

      June 29, 2012 at 1:14 am

      Thank you, Niki!

      Reply
  13. Max Green says

    July 17, 2012 at 7:40 pm

    Wow! This is so awesome. I just tied the knot and I’ve been brainstorming ways to display the wedding photos around my office at Dish without simply stuffing them into frames. I think this project is the answer! Thank you for including detailed instructions and pictures too! Some blogs can be so vague, so I usually find project ideas on HGTV and DIY network; that way I can record them to my Hopper DVR and replay steps when I inevitably get confused! I’m lucky it has such a large memory because I have quite a few projects stacking up. And I am definitely adding this to my DIY list. I hope I pull it off as well as you did. Keep up the good posts!

    Reply
    • Erin Spain says

      July 18, 2012 at 1:18 am

      Thanks so much Max! And congrats on being a newlywed!

      Reply
  14. leanncox says

    July 26, 2012 at 3:38 pm

    THIS IS SO SUPER CUTE!! Will be doing this soon!!!! Have 2 sets of pics that I had made of the boys! LOVE LOVE LOVE!! Great idea!!!

    Reply
    • Erin Spain says

      July 27, 2012 at 12:45 am

      Thank you Leann!!

      Reply
  15. patra Mach says

    July 31, 2012 at 8:49 am

    This comment has been removed by the author.

    Reply
  16. Lovely Abode says

    January 18, 2013 at 9:52 am

    This is a great little project and just love the finished product. Can’t wait to try it…thanks for sharing!

    Reply
    • Erin Spain says

      January 22, 2013 at 7:04 pm

      Thanks so much! I’m glad you like it!

      Reply
  17. Mel the Crafty Scientist says

    March 11, 2013 at 11:46 pm

    Love your blog and this project featuring quatrefoil (one of my favorite patterns!) so I featured your project in my roundup of crafty quatrefoil projects here. Feel free to check it out and hope you like it! (Also, just have to chime in that I LOOOVE this picture – so sweet!)

    -Mel the Crafty Scientist

    Reply
  18. Jacki Poovey says

    April 24, 2013 at 2:26 am

    Erin, I’m doing a post on “quatrefoil love” and would like to link to your fab tutorial. Really great work! Jacki (decoryouadore.com)

    Reply
    • Erin Spain says

      April 26, 2013 at 1:42 am

      Thank you, Jacki! I appreciate that.

      Reply
  19. Lynn says

    September 24, 2013 at 5:52 pm

    I love it! I found you on Pinterest. May suggest one change? Instead of cutting the picture out and then glueing it to the board, glue the picture to the board first. Then you’ll be able to trim the excess picture around the foam and you won’t have to worry about positioning.

    Reply
    • Erin @ DIY on the Cheap says

      September 25, 2013 at 12:03 am

      Thanks for the tip Lynn! I actually considered doing this but was afraid I would rip the picture if I tried cutting with an X-Acto knife and I couldn’t get close enough to the edge with scissors. But maybe this would work well for someone with better precision than I have! 🙂

      Reply
  20. Jessi says

    September 29, 2013 at 12:32 am

    Seriously amazing work! I am inspired! Well done!

    Reply
    • Erin @ DIY on the Cheap says

      September 29, 2013 at 3:00 pm

      Thank you Jessi!

      Reply
  21. Janel Santos says

    June 4, 2014 at 5:08 pm

    Thank you Erin…for the response and the project. It really is fantastic. Your tutorials are great and I love your sense of humor.

    Reply
    • Erin @ DIY on the Cheap says

      June 5, 2014 at 8:37 am

      Thank you, Janel!

      Reply
  22. Tara @ Anything & Everything says

    October 16, 2014 at 11:01 pm

    Love this! What a great idea! Pinning!

    Reply
    • Erin @ DIY on the Cheap says

      October 20, 2014 at 7:03 pm

      Thanks so much, Tara!

      Reply

Trackbacks

  1. Ideas for Inexpensive Wall Art - DIY on the Cheap says:
    October 10, 2013 at 10:55 pm

    […] 6. Make Photo Wall Art […]

    Reply
  2. Quatrefoil Photo Wall Art Tutorial | LasterStudios | Design says:
    January 8, 2014 at 6:06 pm

    […] Quatrefoil Photo Wall Art Tutorial. […]

    Reply

Leave a Reply Cancel reply

Your email address will not be published. Required fields are marked *

SHOP ERIN’S FAVORITES

SPONSORS & AFFILIATES

CATEGORIES

ARCHIVES

Copyright © 2022 Erin Spain. Log in | Privacy Policy